Monday, 30 July 2012

Almond Tiramisu


One of the beauties of Tiramisu is that you can adapt the recipe to fit any dish of your choosing.  In my case here I only had about 2 dozen Saviardi biscuits, so not enough to fit one of my regular tiramisu dishes.

So I searched around my kitchen and found my bread loaf tin and that was an almost perfect fit for 3 layers of biscuits.  Not to worry though as the blanket of cream later will hide the unfinished layer.

Adapting the recipe to suit the makeshift vessel was easy and I've added several dimensions to this one to give a bit of variety to regular tiramisu.

Ingredients

- 24 Saviardi biscuits (it's all i had left. 28 would have been perfetto!)
- 6 tbls marsala
- 100g butter, softened
- 2 tablespoons of creamy peanut butter (take big scoops)
- 1/3 cup + 3 teaspoons of white sugar
- 2 egg yolks
- 3 teaspoons coffee
- 1 cup of hot water
- 1 teaspoon almond essence
- 2 cups of whipping cream
- 2 squares of bitter sweet chocolate

Directions


Layer the biscuits in the cake-tin, generously covering each layer with a coat of marsala.

Separately cream the butter and 1/3 cup sugar, then add the peanut butter and egg yolks and combine on high speed.

In a cup of water mix the coffee and 3 tsp of sugar and microwave for one minute.  Combine with the butter mixture and beat till a bit frothy. 

Butters and sugar creamed
Pour the liquid mixture into the dish, covering the biscuits.  They may even float a little, but don't worry as overnight the bicuits will absorb the liquid and all the fantastic flavors.  Put the cake tin into the fridge for overnight.

When you are ready to serve, whip the cream and almond essence, top the biscuits with the cream and shave chocolate on top to decorate.
All combined
After refrigerating 8 hours
I had this one for breakfast!  How sinful...

Enjoy!


The test is liquid in the bottom

Sunday, 29 July 2012

Cherry Cheesecake


I prepared this cheesecake the night before my parents arrived.  Let it sit overnigh in the fridge and prepared the cherry topping only an hour or so before serving for morning tea.  Looks great and tastes spectacular.  (Jogging required afterwards though!!).

Ingredients

For the crust

- 1 1/2 packets of Arnotts Malt-o-Milk biscuits http://www.arnotts.com/our-products/products/plains.aspx
- 1/3 cup of granulated sugar
- 3/4 of a 250g stick of butter (melted)

For the filling

- 2 x 250 packets of Cream Cheese
- 3 eggs
- 1 can of Nestle Sweetened Condensed Milk
- 1 tablespoon of fresh lemon juice
- 1/2 teaspoon vanilla


For the topping

- 1 can of cherry pie filling
- 1/3 cup water
- 1 tablespoon of corn starch

Directions

Gorgeous crust
Put the Milk Arrowroot biscuits in a sealable food storage bag.  Using a rolling pin, gently crush the biscuits.  In a medium mixing bowl combined the the biscuits crumbs, melted butter and sugar and combine with your fingers.  the Malt-o-milk bisuits are less sweet than the Milk Arrowroot so I add sugar to the base for this one.  Transfer the combined crust mixture to a greased 9" pie dish.  I like using this pie dish for cheesecake as it allow for a lot more of the delicious crust. Press the crumbs firmly into the dish and then bake at 150C for 10 minutes - take out of the oven and allow to cool.

In  a large mixing bowl and using hand beaters, beat the cream cheese and condensed milk until the lumps are taken out.  Add one egg at a time, the lemon juice and the vanilla essence and continue to beat.  Avoid overbaking the mixture.

Pour the filling into the pie dish and place in a baking tray filled to half the height of the dish with water.  This will keep the oven moist when it bakes and prevent your cheesecake from becoming dry.


Cheesecake almost baked

In the water bath
Bake at 150C for 45 minutes checking to see if the cheesecake is done by giving the tray a small shake and the cake should still wobble a bit in the middle when it is done.  Once cooked leave the door of the oven ajar and let the cheescake cool competely in the oven before removing from the oven.  Then allow the cheesecake to refrigerate for 6-8 hours, preferably overnight.

For the topping, combine the water and cornstarch and add to a small saucepan on a low heat.  Add the contents of the canned cherries and simmer until the sauce reduces and thickens up.   Allow to cool in the fridge or pour directly on the cheesecake.
Prepare cherry topping

Run a sharp knife under hot water and use it to cut the cheesecake into the desired sizes.  Very easy to make this one and very satisfying results!

Enjoy!

Thursday, 26 July 2012

Ham and Cheese in Puff Pastry

I have to give a lot of credit to my good friend CK.  He takes a lot of these photos and makes the food look so good!

This is ham and cheese wrapped in puff pastry.  Ideal for breakfast and is ready in about 30 minutes.

Ingredients

- pre-prepared sheet of puf pastry (preferably home-made so it's nice a fresh).
- 2 slices of your favorite ham (thick slices work well here)
- 50g Jarlsberg cheese cut into strips about 2 inches long and 1/2 inch wide
- Pepper and sweet basil
- 1 egg beaten

Directions

Pre-heat oven to 200C.

Roll out the puf pastry to about 8 x 6 inch sheet.  Lay the ham on one half of the pastry leaving about an inch from the edges.  On top lay the cheese slices in a grid and top with pepper and sweet basil. 

Fold the pastry to completely cover the filling and then turn the edges up from the bottom all the way around like an envelope seal.  Using a patry brush seal the envelope with egg wash and turn over and place onto a line baking tray or grill.  Paint egg wash on the top and carve a slit or two in the top to allow air to escape.

Bake for 20 minutes or until golden brown and expanded.

You can really use any cheese you like.  Mozzarella will work well as it will melt more and tend to ooze out when you cut the pastry.  The lovely buttery layering makes this a delightful way to start the day.  Serve with some tomato or chili sauce and a hot cup of coffee.

Enjoy!

Wednesday, 25 July 2012

Macadamia Choc Chip Cookies


If you want cookies like Subway follow this recipe.  Chewy soft cookies with the crunch of macadamia and the sweetness of choc chips.  Ready to eat in 40 minutes

 Ingredients

- 175g softened butter
- 1/3 cup fine black sugar
- 1 tbls white sugar
- 1 egg
- 1 tsp vanilla essence
- 1 1/8 cup of flour
- 1/2 teaspoon baking soda
- 3/4 cup chopped macadamia nuts
- 3/4 cup choc chips

Directions

Pre-heat oven to 190C.  For fan-forced oven i use 180C.
Look at the gorgeous mix
In a medium mixing bowl cream the butter and sugars.  i have made the mistake of using granulated brown sugar when the shop didn't have a fine packed sugar.  The grains don't dissolve and your left with sugar granules in your cookies.  So wait for the fine grain...  Once creamed add the egg and vanilla and beat well.

In a separate bowl sift flour and baking soda together.  Add gradually to the butter mixture and the mixture will dry out a lot. (Cookie mixtures should be a bit on the dry side).

Add nuts and choc chips and stir in well.


Ice-cream scoop gives consistent size


Using an ice-cream scoop or spoon, spoon out round balls.  I make mine almost 1.5 inch diameter to give a 3 inch diameter cookie.  The cookie dough will spread as it cooks but then the baking soda will kick in to limit its lateral extension.  (Very technical ya?)...

12-15 minutes in the oven till golden brown and a little firm to the touch. Transfer to a grill till completely cool.

Perfect with a hot coffee.

Enjoy!

Monday, 23 July 2012

Lemon Meringue Pie


First saw this one as a challenge on Masterchef and wanted to have a go at it myself.  A challenging dish as it requires making a good flaky pie crust, a well combined filling and a fluffy meringue with a crispy coating.  Give it a try!

Ingredients


For the pastry
- 1 1/2 cups all purpose flour
- 1/2 teaspoon salt
- 2 tsp castor sugar
- 150g butter chopped in cubes
- 1/3 cup of ice cold water

For the lemon filling
- 1/2 cup castor sugar
- 1/2 cup corn flour
- 1/3 cup water
- 2 large lemons zest and juice
- 5 egg yolks  (save the whites for the meringue)
- 100g of butter

For the meringue
- 5 egg whites
- 1/2 cup of castor sugar
- 1/2 teaspoon cream of tartar

Directions


For the pie crust, combine the dry ingredients first, then using 2 knives or a fork, cut in the butter till it forms a coarseness combined with the flour.  Add a little of the water to help combine the dough and then knead just a little.  The key is not to touch the dough too much as we want to keep the butter from melting.  Wrap the dough in plastic and let rest in the fridge for 30 minutes.

While that is resting we can make the lemon filling.   In a medium saucepan mix the flour, sugar and water and combine.  Add the lemon zest and bring the mixture to the boil.  You will notice it thicken very quickly so continue to stir the mixture as it heats up.  Remove from the heat and whisk in the egg yolks, lemon zest and butter.  Return to the heat but lower the heat to cook until thickened and smoothed stirring throughout.  Remove from the heat and allow to cool completely.

Whisking egg whites
Pre-het the oven to 150C, a little less for fan-forced ovens.  Roll out the dough and pad it onto a greased 9" pie dish.  I place a sheet of baking paper over the crust and then put rice on the paper to weigh it down and blind bake the dough for 10 minutes with the weight, then remove the weight and bake for another 5 minutes until golden brown.  Remove from the oven and allow to cool

For the meringue, pour the egg whites in a large, clean mixing bowl and beat on high speed for 5-10 minutes until stiff peaks form.  Only then add the cream of tartar and gradually add the sugar continuing to beat the eggs. 

Now the fun part.  Pour that gorgeous yellow filling into the pie crust and using a plastic spatula top with the meringue putting a bit of design in the peaks of the meringue.  Bake for 30-40 minutes until the meringue is browned and crisp.  Turn off the oven leave the door open and allow the tart to cool completely inside the oven. 


After baking

Serve warm for the best of the crispy meringue or refrigerate and slice later.
Before baking

Enjoy!


Sunday, 22 July 2012

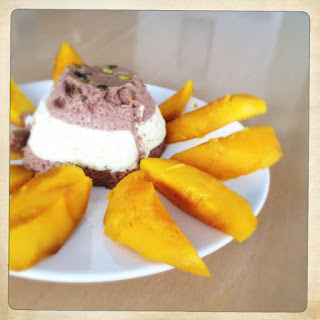
Chocolate Pistachio Semifreddo

 Refreshing on a hot day.  Multi-layer with different flavours...

Ingredients for Chocolate SemiFreddo

- 2 eggs separated
- 1 tablespoon sugar
- 100g of bitter sweet dark chocolate
- 200mL of heavy cream

Ingredients for Pistachio

- 70g of pistachio nuts (peeled and skinned)
- 1/3 cup water
- 3 tbls sugar
- 2 eggs separated
- 200mL heavy cream

Directions

3 components for mousse
This is not a difficult dish to make but just requires a bit of organisation and a lot of mixing bowls.  I followed the following sequence.

Skin the pistachio nuts by putting in hot water for 2 minutes.  Then pour into a collander and the skins will come off easily.  Lay on a baking tray and put in the oven on 100C for 15 minutes to dry out. 

While that's going do the following :
- Melt the chocolate on a double boiler 
-  Beat the 2 egg whites till they form stiff peaks. 
-  Beat the cream until nicely whipped. 
-  Add the egg yolks and sugar to the chocolate and beat on high speed.

You'll need to wash the beaters between each one of those.  Then combine the egg whites into the chocolate mix with a plastic spatula and then the cream and stir until a nice smooth consistency like a chocolate mousse.

Take a dozen of the pistachios and chop up fine.  Put these in the bottoms of 4 dessert dishes.  On top of each  using a ice cream scoop put 3 scoops of chocolate mousse into each bowl and put in the freezer for 20 minutes.  Put the remaining chocolate in the fridge.

While that is setting in the freezer you can make the pistachio mousse in the same way.  First though you need to make a pistachio paste.  Using either a blender or food processor, add the pistachios, water and 2 tablespoons of sugar and blend until well blended.  You might need to brush the sides of the processor a few times to ensure all pistachios get processed.

After that the steps of beat the eggs, cream and pistachio with egg yolks and sugar are repeated to form a pistachio mousse.  Take the dishes from the and layer each one with 4 scoops of pistachio mix.  Then put back in the freezer for 20 minutes.

After that has set fill the dish with more chocolate mousse and put in the freezer for 6 hours to set nicely.

I found i had about half of the pistachio mousse left over, so you may be able to halve the ingredients above, save the mousse or just make a separate one with pistachio alone.

Served here with fresh mago slices or cooked strawberry topping.

Enjoy!


Aussie Meat Pie


Great to have an Aussie meat pie (large version) with your own home-made puff pastry and mushy peas...

Ingredients


- 500g of beef (I use a combination of beef mince and chilled beef cut into small pieces)
- 1 tbls oil
- 1 large onion diced
- 2 cups of button mushrooms sliced small
- 1 tbls BBQ sauce
- 2 tbls Worcestershire sauce
- 3 tbls Tomato sauce
- 1 tbls basil
- 1 teaspoon salt
- 1 teaspoon ground black pepper
- 1 cup of beef stock (with 2 stock cubes)
- 3 small sweet potatoes peeled and cut in half
- 1/2 cup of grated mozzarella cheese
- 2 sheets of puff pastry
- 1 egg yolk beaten with 1 tbls milk for an egg wash

For the mushy peas
- 1 can processed peas
- 1 tbls butter
- 1/2 teaspoon salt
- 2 tbls cream

Directions

Fantastic aroma from the beef
Heat the oil in a medium saucepan and add the onions cooking till translucent then the mushrooms and cook for a while on medium heat.  Then add the meat and brown.  Add the rest of the sauces and spices, cover and let simmer for an hour or so. 

Separately boil the potatoes for 25-30 minutes and when a knife can cut them easily, cut into small cubes and add to the meat mixture.  Allow to cook together with the beef for a while then remove from the heat and let it cool completely (30-40 minutes).

Pre-heat the oven to 210C, for fan-forced maybe a little less hot - you can see that my pie is a little burnt in places.  Maybe 200 or 190C is enough.


Roll the pastry onto the pin to transfer to the dish

Grease a 9" pie dish and roll out a sheet of puff pastry to line the bottom of the dish.  Add the meat filling, top with grated cheese and cover with another shet of patry.  Trim or fold the edges, push the side diwn with the back of a fork, cut 2 slits in the middle of the pie with a sharp knife and then top with the egg wash.


Put the pie in the oven for 35 minutes, checking occasionally to see that it's not burning on top.


With 5 minutes left to cook, add the butter to a small saucepan and melt, add the peas and the salt and then mash the pease and cook for a few minutes on medium heat to make the peas mushy.  Add the cream and drop the heat.  Stir it up and serve with a slice of that fantastic meat pie.

  
Enjoy! 


Pie ready to go into the oven

  
Pie ready to be topped


Friday, 20 July 2012

Chocolate coated Strawberries


Here's a snack that is dead easy to prepare, tastes good and relatively low in calories compared to a more heavy dessert.

Ingredients

- a dozen fresh straberries (washed with leaves kept on)
- 50g of bitter sweet chocolate
- 2 tbls heavy cream
- 1 tbls icing sugar
- 15g of white chocolate

Directions

Melt the chocolate, cream and icing sugar in a small saucepan on low heat.  Stir the combined ingredients till become thick.  Take of the heat and allow to cool for 5 minutes.

Place a toothpick in the end of each strawberry and carefully dip the end of the strawberry into the chocolate mix, coating the exterior, leaving about a quarter of an inch near the leaves free from chocolate coating.

Stick the exposed end of the strawberry into a piece of styrofoam.  Place the foam into the fridge for 30 minutes allowing the chocolate to harden.

After 30 minutes, melt the white chocolate in a small saucepan and dip a fork into the melted chocolate coating the prongs of the fork.  You can swish the fork over the strawberries to coat them with a bit of a random streak of chocolate.  This gives a free hand feel to the design.

Refrigerate for 10-20 minutes or until ready to serve.

These have a nice festive season look with the red, green, black and white colour combination.


Enjoy!

Thursday, 19 July 2012

Gnocchi Gorgonzola


Succulent, scruptious, rich and devine!  How else to describe gnocchi gorgonzola.

Ingredients


For the Gnocchi
- 500g of Russet potatoes.  (About 5 small ones)
- 3 cups of all-purpose flour
- 1 teaspoon salt
- 1 egg
- 1 tbls extra-virgin olive oil
- deep saucpan with water to cook the gnocchi

For the sauce
- 3 tbls unsalted butter
- 1 1/2 cups of heavy cream
- 1 1/2 cups of milk
- 100g of gorgonzola cheese
- 100g of parmesan cheese
- 1 tbls chopped chives
- salt and pepper to taste
- parsely to garnish


Directions

Wash the potatoes and then boil, steam or bake them.  If i'm strapped for time i peel them, cut them in half and boil them as this is the fastest way to bring them to the necessary texture.  For better preservation of flavour the other options are preferred.

Once boiled transfer potatoes to a large mixing bowl, use the back of a fork to mash.  Leave for 20 minutes to cool.  This is very important as cool potatoes will absorb less flour and the less flour you use the softer your gnochhi will be.


Gnocchi rolled off the fork and ready to cook

After the spuds have cooled, add the salt, egg and oil and use a wooden spoon to combine.  Gradually add flour to the mix about 1 cup, transforming your mashed potatoes into a dough. Pour out onto a lightly floured surface and knead the dough until smooth and not sticky.  You'll have to gradually add more flour at this stage 1- 1 1/2 cups.  Spread the remainder of the flour on the bench and on the plates that will receive the gnocchi.

Cut a 1/4 of the dough and roll into a long strip about 1/2" thick and cut into small pieces with a sharp knife.  Using the back of a fork roll the gnocchi down the fork and onto the surface or straight onto the plate.  The gnocchi will expand a bit when they cook, so small gnocchi are nice.

Gnocchi float to the top when done
Boil the saucepan of water and add 1-2 dozen gnocchi at a time to the water.  They will sink to the bottom and then when cooked will float to the surface.  This will only take 30 seconds to one minute.  Remove with a slotted spoon and put into a collander to drain any excess water.  Continue to do this for all the gnocchi.

In a small saucepan, melt butter and add cream, milk and chives on medium heat.  Once the sauce starts to bubble drop back the heat and stir.  When it thickens add cheese and stir in to the sauce.  Add salt and pepper to taste. 

In a large saucepan put the gnocchi and pour in that lovely creamy gorgonzola sauce.  Mix well and transfer to a serving dish.  Top the gnocchi with chopped parsely and serve with a fresh green salad.

If you make this one you have to promise me to do some gym because it is sinful but tastes great.

Enjoy!

Wednesday, 18 July 2012

Beef Wellington


 This one really was inspired by Gordon Ramsey and the Masterchef show.  When he said to a contestant that making the perfect beef wellington requires practise (i think he quoted 500 times as being the amount of practise required), I thought i should try my first and see how i went.

I added another degree of complexity and hardship and made my own puff pastry as well.  I have done that several times already though so making my own puff pastry didn't concern me so much.  I have a post on how to make your own puff pastry.

Ingredients

- 1 sheet of puff pastry (defrosted)
- 1 x 2lb piece of topside beef
- 2 Tbls oil or butter for searing the meat
- 1 cup of slices mushrooms
- 4 slices of ham
- 2 Tbls of yellow mustard
- 2 egg yolks beaten
- Salt and Pepper for seasoning the beef

Directions

In a medium sized skillet, heat the oil or butter.  Season the beef with salt and pepper and add it to the skillet searing the beef on all sides, just well enough to brown each side, say 3-4 minutes per side and then allow to cool.  The beef will cook more in the oven later.  It's now a good time to switch on the oven, pre-heating it to 220C.


Puree the mushrooms in a blender and then transfer to a small saucepan with a little melted butter till soft.  Tip out any excess liquid and then set aside to cool.

Roll out a long sheet of Glad Wrap.  place the ham slices on the plastic in a row slightly overlapping the edges by about a 1/4 of each piece.  Spread the mushroom puree on the ham slices.

Coat the outside of the beef with the yellow mustard and then place on the mushroom puree. 

We now roll the ham slices around the beef and tightly wrap the plastic.  Pop that in the fridge for 20 minutes.


Before

Roll out the patry large enough to wrap the beef.  Unwrap the beef from the plastic and place in the centre of the pastry.  fold the pastry around the beef and seal with the egg wash.  With a pairing knife put several diagonal slits in the top of the pastry - this will allow air to escape while in the oven.


After

Place on a baking tray and that goes into the oven for 30-35 minutes.  Check the beef temperature with a meat thermometer regularly.  65C for medium-rare, 70C for medium and anything hotter than that and it's not beef wellington!

Let the beef package rest for 10 minutes before slices and then slice into thick pieces and serve with mashed potatos and caramelised onion gravy...

Enjoy!


Plated up with mash and onion gravy

Look at the gorgeous puff pastry